Though this entry will focus on the use and the configuration of Actions, I want to start with showing a screen shot of the graphical jPDL editor showing a simple process.
 As you can see the current selection is the transition that leaves the start state and enters the second node, which is a state. Below the graphical canvas, you see the tabbed properties view. This view is dynamic and allows you to configure all the relevant properties of the current selection. For transitions, the tabbed properties view contains four tabs. The first one is the General tab in which you are able to specify a name and a description for the transition. Both of these properties are optional for transitions. I will treat the Condition and the Exceptions tabs in another entry and concentrate on the Actions tab for this time.
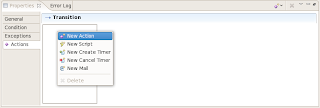
 You can use the Actions tab to add action elements to the transition. These action elements get executed when the transition is taken during process execution. The first way to add an Action is to use the popup menu of the action element container as is shown on the screenshot above. The other way is to simply use the dropdown menu that is available under the action icon in the right upper corner of the Properties View. As you can see an Action is only one of the five action elements that you can add. For now, let's focus on the Action and take a closer look at how you can configure it. After adding the Action a tabbed view with three pages will appear. The result is shown in the screenshot below.
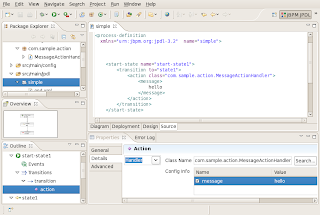
 The first of these three pages allows you to give the Action a name, making it possible to reuse it somewhere else in your process definition by referencing to it by its name. The last page contains some advanced attributes such as whether the Action is asynchronous. The most interesting page is the Details page where you are able to choose and configure the actual action handler implementation. This is shown below.
 The chosen action handler is the class MessageActionHandler which has one configurable field message. The configured value for this field is the string 'hello'. The example is a bit simplistic in the sense that this particular action handler will only store the configured value as a variable in the process context. Of course it is possible to make action handlers do much more interesting stuff.
A transition can contain many action elements. Each of these will appear in the action element list of the Actions tab. But each Action also has a properties view of itself. You can navigate to this view by selecting the added Action in the outline view. The screenshot below shows that the Action properties view contains the same three tabs as before offering the same configuration possibilities. It also shows how this configuration has been translated in the corresponding XML in the source view of the editor.
 This ends the first entry of this series. If you want to try out our new GPD, please download it here. Note that the GPD is an Eclipse plug-in so you will also need the Eclipse 3.2.x SDK. To use it, extract both the Eclipse SDK archive and the GPD archive into a folder of your choice and launch the Eclipse executable. Note also that in order to create jPDL projects, you may need to download a jPDL runtime. Just extract the archive somewhere on your hard drive and point to it when asked by the wizard when you are creating the jPDL project. If you want to know more about jBPM and jPDL, go to our community pages.
Have fun,
Koen
